


|
| Copyright © 2006 Marc Elieson |
|
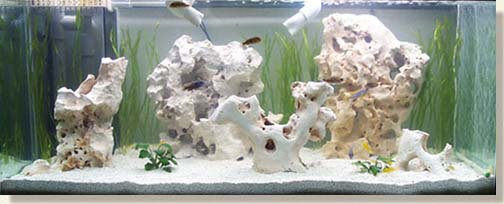
This is my 75-gallon Oceanic grow-out tank. The decorations and rock work used to be quite sparse, but have since been replaced with 102 pounds of honeycomb limestone (aka. Texas Holey Rock). This tank serves the purpose of housing my medium-sized fry and juveniles until they are large enough to either sell or move over to my 135-gallon show tank. The plants along the back are Vallisneria spiralis, also known as the "Corkscrew" Val, and two smaller ones in front are Anubias nana.
|
|
|
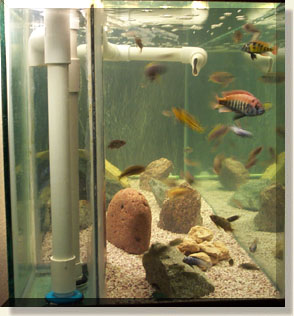
I received this tank free from a pediatrician in town who was tired of paying someone to take care of it. After spending a week refinishing the stand and canopy, I added some of my own filtering ideas to it and then filled it up. He had used it as a saltwater aquarium, and so I inherited his crushed coral gravel, which was actually a rose color. For a while I used this, but there wasn't enough to bury my undergravel jets. So, after almost 12 months, I decided to scrap the rose gravel (which I couldn't order more of) and replaced it with aragonite crushed coral. This is the smallest grade of gravel before it turns into sand. I am now much happier since the tank has the undergravel jets. Currently, I never notice any detritus in the gravel, which is white and would readily reveal any waste, but the rose-colored gravel often had fecal waste floating around in it. The jets are inconspicuous and the submersible Rio 2100 is hidden behind the rock on the right.
|

|
Filtering begins by flowing over the top of this glass (overflow) box which I glued in the back corner using silicon. It sits about 2 cm below the top of the tank (or surface of the water). To prevent small juveniles from being swept over into the box, I cut some eggcrate and glued the pieces to the top of the glass using silicon. I felt that the eggcrate holes were still too large so I glued a second piece of eggcrate behind the first, offsetting it by half a cell's width. I glued the two pieces of eggcrate together using Methylene chloride, the same chemical I use to melt Plexiglas pieces together. |
|
|
All reef tanks have overflow boxes similar to this one. Where this one departs from the rest is in the design of its intake tube. Most have a tube at the bottom with a couple dozen holes in it. The problem these cause is that the water is allowed to flow into the pipe quickly, creating an awfully loud gurgling noise, something akin to someone blowing their nose or a toilet flushing. Running 24 hours a day, that can get very annoying, very quick. This less-than-ideal design also permits the water to drop some 15 inches before it reaches the level of the water in the overflow box, creating a loud splashing noise. This means that the water level in the overflow chamber is usually no higher than 3 inches deep. It was these problems that impelled me to fork out $65 for Marineland's Silent Overflow Skimmer for my 135.
Note: This is an older picture of the same tank, hence the difference in décor. I really like that P. nererei! |
|
|
|
Well, I have long since learned that if you want to be creatvie or ingenuitive you need to seek out the serious saltwater reef hobbyists for inspiration. And so about a year ago I came across Richard Durso's Saltwater Page. He had a similar problem to the one I have already described. He solved this problem by using a solid stand pipe with a submerged intake. The intake would need to be as high as possible, and a hole would need to be drilled in the top. The advantages this design has over the average overflow box is that there is little to no water fall, converting the chamber into a refugium. It is whisper quiet, with no splashing or gurgling. The chambers don't drain in a power outage and the pipe is self-priming! And how much for this simple design? About $5 plus any bulkheads you need to purchase. But even these can be homemade, which beats the $15 your lfs will charge you. I discuss more about making your own bulkheads and sumps in my article Building Sumps if you want to learn more about this. |
||
|
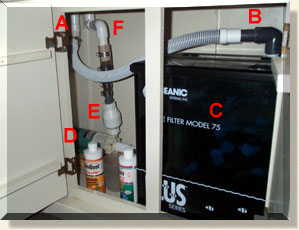
After flowing over into the overflow chamber, the water will silently be sucked into the stand pipe's intake. It then passes (A) through a bulkhead and into my trickle filter (B). I was going to build my own trickle filter but got a great deal on this used Oceanic brand trickle filter. The water then flows through several compartments, including a comparment with about 150 bio-balls (C), which is where the actual filtration takes place. It then passes from the trickle filter to my Iwaki WMD 20RLXT (540gph) (D). Before returning to the tank, the water passes through a check valve (E), which prevents back flow in the event of a power outage. From here it passes through another bulkhead (F) on its way back up. |
|
|
The second pipe in my overflow chamber is the return pipe, which then branches into two "jets." These are 1" PVC pieces that I boiled and clamped with plyers. (For more on this, see Water Movement In The Tank.)
|

|
|
|
I use a bubble wand along the right-hand side of my tank to create an upward current (also facilitated by the downward angle of the return pipes), which also helps to break the surface of the water (also facilitated by the overflow box and trickle filter). The trickle filter also has a place where I can attach a bubbler so that I can pump bubbles into the chamber with the bio-balls. Let me just make a couple of afterthought comments. If I were to do the filtration for my 135-gallon show tank over, I would use Richard Durso's standpipe design, but would keep everything else the same. I would only do this to save $, eventhough I prefer MarineLand's S.O.S. because of its compact size. By the way, it is not perfectly silent as it advertises, but is quiet enough. I love the undergravel jets my 135 has (and this one did not) and so I had to put them in this tank. I never have to vacuum filter the gravel! After almost a year, I decided to vacuum the gravel in my 135g and didn't pull up any debris! I prefer the Tidepool 2 as far as maintenance is concerned, but find this particular Wet/Dry filter is sufficient. The Iwaki works fine for this setup, but the GRI I use for my 135g is far superior. The GRI is truly silent and more energy efficient. The only reason I went with the Iwaki was because GRI did not have a pump that matched the gph I needed. And the Iwaki was cheap. Remember, this is just my grow-out tank. If you haven't seen my 135-gallon show tank setup, you can click here to see it. |
||
|
All contents of this web site are Copyright © 2000-2016 Marc Elieson |